How to Start a WordPress Blog?
Setup WordPress Blog in under 30 mins
One of the best ways to gain exposure, make your voice heard or to earn some decent bucks is to start a blog. When you embark upon blogging, one of the first choices you make is to go with WordPress, the most successful and intuitive blogging platform.
Though WordPress is extremely intuitive, chances are that you will find it a little troublesome when setting up your first blog with WordPress.org. Indeed, setting up a blog on self-hosted WordPress is probably the only though part about using WordPress; all else, like posting and promoting is a cake walk. But if guided precisely, the task of starting a new WordPress blog isn't that hard either.
So here is a simple guide that I meticulously crafted to help you start a WordPress blog with minimum hassle. You should be having your WordPress blog up and running in less than 30 minutes if you follow this 3 step process as it is.

Prerequisites to start a WordPress blog
Well there is not much you need; just about 1/2 an hour from your day’s schedule, a credit card/online banking and a heart full of enthusiasm.
I assume you’ve all of that. Lets get going then….
I assume you’ve all of that. Lets get going then….
Step 1: Buy/Register a Domain Name
Domain name is the web address that pertains to your blog. It can be registered from any domain name registrar like GoDaddy, NameCheap, etc. There are certain things you need to look into while buying a domain name for your blog.
How to register a domain name with GoDaddy?
- It must relate to you brand ( or you niche if its a simple blog not belonging to a brand).
- It must be easy to remember and type.
- Go for a dot com domain, unless you want your blog to be localized.
- The domain name must be brand-able.
- Register a domain for as long as possible and set the registration to auto-renewal to safeguard you interest.
- Use your niche’s primary keyword in you domain.
- The name must not be longer than three words.
- Register multiple extensions (.org, .info, .net, … ) and point them all to your dot com. This prevents misuse of your domain name.
- Find your ideal domain and register it quickly before you loose it. Domain names sell like hotdogs.
How to register a domain name with GoDaddy?
- Create an account at GoDaddy.com. Log-in with your id.
- Go to the domain name registration page , and enter the desired domain name in the domain search bar provided. Hit search.
- If the domain name searched for seems available, then add it to the cart by clicking the add ( or continue, whichever is available) button to add the domain to the cart. Else, try another domain name until something is available.
- Go to your cart where you will find your domain name listed. Select number of years for the registration from the drop-down (next to the domain name).
- Click on Register or Checkout to register the name.
- You will be directed to billing page where you need to enter the credit card/net banking details and check the I agree check-box for GoDaddy T&C in the sidebar.Proceed to payment.
Step 2: Buy a Web Hosting Service for your Blog
The domain name registrar only hosts your web address. To host a blog, you need to signup with a web hosting provider. Though Godaddy provides web hoting as well, it is always a good idea to host the blog elsewhere. I always go for HostGator web hosting which is considered to be one among the best web hosting providers. Reasons why I advocate HostGator web hosting are
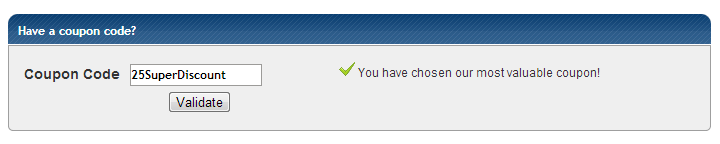
Don’t forget to use the 25SuperDiscount HostGator discount coupon code for a 25% discount on billing.
- HostGator hosting has been known for least downtime as compared to any other host.
- HostGator provides multiple plans for every budget.
- HostGator is very easy to use via cPanel.
- HostGator has an 24×7 excellent customer support that address your concerns in a snap.
- HostGator provides unlimited disk space in all its plans.
- HostGator guarantees 45 days money back if you need to opt out.
- Go to HostGator to buy a hosting.
- Select Web Hosting from the menu bar.
- Select a plan (Hatchling or Baby plan) for a period of atleast 1 year (from the drop-down menu).
- You will be directed to the ‘HostGator Order Wizard’.
- Check the ‘I already own this domain’ radio button and enter the domain name purchased from GoDaddy earlier.
- Scroll down and choose a billing cycle. Longer the billing cycle, better you save.
- Go down further and enter a desired user id and pin for HostGator account.
- Next, fill in the mailing address and payment details.
- Scroll down to ‘have a coupon code?’ section and enter 25SuperDiscount and hitvalidate to get a 25% discount.
- Finally check the T&C check-box and proceed to create an account.
Don’t forget to use the 25SuperDiscount HostGator discount coupon code for a 25% discount on billing.
Choose a longer (1year and above) hosting period and billing cycle to get the cheapest deal for yourself.
Step 3: Install a WordPress Blog in HostGator
This part is meant to be really perplexing. But thanks to HostGator, for it comes with an greatly handy tool called QuickInstall in its cPanel. QuickInstall really installs WordPress quicker than ever before.
See the below video to go through the installation process.
The demonstration shows that WordPress is installed in a sub-directory (myblog). But you can choose to have it in the main directory. To do so, just leave the 1st text box in the Install WordPress screen empty( instead of typing in ‘myblog’ as in the video).
Hope this – How to start a WordPress blog? tutorial proves useful to you.
Congratulations on you 1st WordPress blog. Happy Blogging !
Congratulations on you 1st WordPress blog. Happy Blogging !
